Sunday, September 22, 2013

Studio Night Broccoli Cheese Soup

Ok, ok...so we haven't created any new entries for MONTHS. But we've been crazy busy with a major move this last summer and you probably know just how exhausting that can be! But hopefully, this recipe will make up for it! School is in full force and I have a new bunch of kiddos taking part in the Art after school program we call "Studio Night." Anyone who has had a hoard of teens to contend with, when they're ravenously hungry, will appreciate this wholesome and filling soup. Not that they care, but this is good for you and vegetarian! 

Start with veggies, loads of them. I use one medium onion, a good handful of carrots, one medium zucchini, 2 or 3 small potatoes, one rib of celery and 3 or 4 stalks of broccoli.
Chop up the clean veggies, except the broccoli, and saute in a small amount of vegetable oil on medium high heat in the following order: first throw in the potatoes and carrots; they take longer to cook than the rest. After about 3 minutes, add the celery and onions. At this point, you're basically stir-frying. Another 3 minutes or so and you're ready for the zucchini.
Add 2 tablespoons of real butter and 1/4 cup flour. Toss the veg quickly to coat with flour and turn down the heat to medium. Cook for 5 more minutes to get rid of that raw flour taste. 
Add  5 cups of whole milk and scrape the bottom of the pot to get all of the caramelized goodness into that creamy base. 
Now add your chopped broccoli. When I clean my broccoli, I always peel the stems before chopping. This assures tender, non-stringy chunks of broccoli. Next, mix up the cheesy, saucy addition that goes so well with broccoli.


I like to use Rico's Condensed Aged Cheddar sauce, a whole 15 oz. can. But you can use whatever is your family's favorite.
Into the cheese goo and your favorite spices/ flavorings, whisk one 12 oz. can of evaporated milk--NOT sweetened condensed milk! It should be thick but pourable. I add about 1/4 cup of pickled jalapeno brine, 1 teaspoon granulated garlic and a splash of liquid smoke. We like it a bit Texanized :) 


I take the soup to school so into the slow-cooker crock it goes. If that isn't a part of your plan, keep it all in the soup pot and simmer until the broccoli is tender. You can add a bit more milk or water if it's thicker than you like.


When I get to school, I'll put the soup on low and add water (how much depends on if there will be 12 or 20 attendees). I'll adjust the salt level to the added water amount.
For super Cheesy-ness, bring chunked melty-style cheese to throw in the mix. I provide whole grain crackers to complete the after school meal for my fabulous student artists. It'll be gone within the first 15 minutes of the event!

ENJOY!

Thursday, March 14, 2013

Easy as Pie!

I had 5 apples that I had to use before they went south so along with a lemon, some sugar, flour and shortening--pie is born. Anytime you have raw fruit to work with, you'll need to add a couple of tablespoons of flour to the sugar you combine with your fruit (pictured above).

The apples are sliced by quartering and cutting out the core pieces. I always like my fruit to taste "bright," so adding lemon juice is a must. Apples are tossed with the lemon and sugar/flour mixture and set aside. 

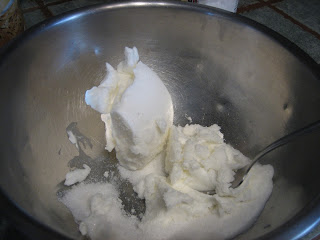
shortening and sugar
shortening, sugar and oil

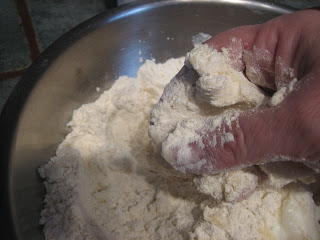
Putting pie crust together is more an art than science; though I'm certain Alton Brown and his buds would disagree! I feel my way through, as the pics show here.
In a medium sized bowl, for a largish pie, spoon a generous cup of solid vegetable shortening and add to half of the shortening lump about 1/4 cup sugar. Beat together the sugary shortening and about 1/4 cup liquid vegetable oil. Leaving solid shortening will create that flaky pie crust we all love.


 Put twice as much flour as shortening into the bowl. Add a pinch of salt and then carefully use your hands to mix. Gently work the shortening into the flour, leaving small pebbles of solid shortening. These pebbles will flatten out when rolled and make the crust layered with flakes as the hot air turns it to liquid. Preheat the oven to 400 degrees.


 After your dough looks like cornmeal with pebbles, STOP! Don't overwork it! Put a fork to it and toss as little by little very cold water is drizzled into the dough until it pulls together into larger, stickier lumps. Again, STOP! Don't over mix! Some of the flour mixture will look a bit dry, especially on the bottom of the bowl--that's okay.


add cold water and toss


Turn out onto a plastic wrap covered surface, bring the plastic up around the dough and press into a circle. Open it up and cover with more plastic wrap. Roll from the center outward until it is a consistent thickness--thicker is more "rustic." I like thicker, free-form pies.

After you press your dough into a circle, it helps to chill the dough for an hour or so in the frig. While this is not absolutely necessary, it makes the fats solidify and then really pop in the hot oven.


 After you roll out your dough, remove the plastic from the top. Slide your right hand under the bottom plastic wrap and with your left hand, cover the dough with your pie plate or cookie sheet. Flip it quickly so that your right hand is now on top and the crust is in the pie plate. Peel away the remaining plastic wrap and fill with fruit. Top with small chunks of butter and sprinkled sugar. Pictured below: Free form, "rustic" apple pie.


 It usually takes about 40-50 minutes for a large pie to bake if you're using raw, dense fruit like apples. To check for doneness, stick a sharp knife into the apples--if they're soft but still a bit firm, you're golden! If you want a shiny crust, brush it with a little half and half before baking and sprinkle lightly with sugar. Add vanilla ice cream if you're feeling extravagant. Enjoy!

Holy Crepes!

I peer into the frig. Hmmmm, what to make, what to make. I need to grocery shop. I see a few eggs, bits of cheeses, a bunch of asparagus, leftover mashed potatoes...that's it! Crepes!

Jan's Basic Crepe Batter 
2 C. milk
3 eggs
1 1/2 C. flour
pinch salt, 2 TBS. oil

I'm not sure why everyone quakes at the thought of making crepes. You need a non-stick saute pan, wire whisk, spatula and simple techniques (and of course, filling). Fillings can be just about anything, sweet or savory. Experiment! I'm using leftovers; as grandma used to  say--waste not, want not!
Whisk together milk, oil and eggs. All at once, add flour/salt and whisk the dickens out of it.  Use a ladle and pour a dollop of batter into a small, non-stick saute pan preheated to med-high. As soon as the batter hits the pan, swirl to coat evenly on the pan's hot surface by tipping up and around (pic below).

No need to flip, just turn the pan upside down over the plate and they'll flop right out. You'll need to help just a bit by loosening the edges with a rubber spatula just as they look cooked through. The batter shouldn't have any gooey-ness on the surface of the crepe if it's done. Cover the stack with a damp paper towel and set aside while you assemble the filling.
 Don't worry, they won't stick together.
I've peeled the asparagus stems and foraged fresh, spring dandelion greens. Both get lightly steamed, drained and chopped.


I've cut up a medium sized onion, caramelized in butter and deglazed with my current favorite white wine (Moscato--fabulous!!)
Now, for the leftovers. I grated all the cheese bits from the cheese drawer with some shredded mozzarella and combined the above ingredients with the mashed potatoes. I seasoned with garlic powder and nutmeg. One at a time, fill the crepes and roll up. Place them seam side down into the baking pan.
I made a little white sauce to nestle and top the crepes into the non-stick sprayed baking dish. Bake crepes, covered with foil, at 350 degrees for 25 minutes or until just heated through.White Sauce: melt 2 tablespoons butter over med-high heat, add 2 tablespoons flour and whisk for about 3 or 4 minutes. Add about 4 cups milk gradually as you whisk. When it reaches the lump-free gravy consistency you desire, stop adding milk. Add salt to taste.
Beside seared leftover meatloaf, crepes are most nom nom nom-ful!

Monday, March 11, 2013

Lettuce Soup


Lettuce soup- lemme tell ya. Maybe you have your own garden, you planted waaaaaaay too many beautiful, leafy lettuces, and now you have eaten as much salad as you possibly can...  maybe you belong to a veggie co-op, and every week you get at least two heads of lettuce... maybe you just like surprising the fam at dinner time with something totally outside the box. No matter the reason, you have got to try this one out.

How to flesh out a dinner with the star being a big, vibrant, steaming bowl of emerald lettuce soup? How about a deconstructed BLT night? Lettuce soup with crumbled bacon, tomato and mozzarella salad, and garlic toast! Give it a try, and trust me, it'll be a hit.

Courtney's Lettuce Soup
Makes enough to easily feed 8

1 large sweet yellow onion, chopped
3 big cloves garlic, smashed and peeled
1-2 TBS good olive oil
1 rib celery, leaves included
4-5 small-ish peeled russet potatoes
1 liter good chicken stock
2 heads green lettuce, any variety (the darker the green, the higher the nutrition, FYI)
salt to taste

1/2 & 1/2, heavy cream, kefir, yogurt, or aioli for garnish
crisped bacon, for garnish

In a large stock pot on medium-high heat, saute onions, garlic, and celery in olive oil with a pinch of salt. When
onions start to get soft, add peeled, chunked potatoes. Cover with chicken stock and bring up to a boil.

While potatoes are softening, chop lettuce, wash thoroughly, and dry as much as possible. Try to avoid adding any extra moisture to your soup... I used a salad spinner to get rid of extra water clinging to leaves.

When potato chunks can easily be smashed with the back of a spoon, add lettuce.

It may seem like you have way too much lettuce, and you may
even have to add it in batches to keep it from overflowing the
pot... but trust me, it'll cook waaaaaay down.

Once all lettuce is wilted but still bright green (it will happen very quickly, don't overcook or you'll end up with
a dull, avocado-green soup!), remove from heat.

Puree lettuce and potato mixture in batches in blender. Make sure
you don't have a tight-fitting lid, or you've removed the center of the
lid to allow for steam to escape. Use a dishtowel to cover blender.

Once pureed, it's basically ready, but you can return it to the pot and keep it warm on your lowest heat setting (don't forget overcooking it will make it lose it's vibrant green color). Serve with a drizzle of cream and a sprinkling of bacon.

At my house, lettuce soup is the best way for me to get my kiddos to eat those leafy greens... I've never tried this recipe with more intense greens like spinach and chard, but those are so easily disguised in quiches and omelettes  I'm content to let lettuce shine in this one. 

Enjoy!

Monday, February 18, 2013

Mom's Potato Leek Soup

There's nothing more comforting, simple, or satisfying than your mom making you a rich, thick potato soup... except if maybe she throws in some fresh leeks, and makes it in your kitchen so you don't have to pack up the kids and go anywhere. Especially when it's still pretty chilly, and your dad is entertaining said kids so you can just be with your mom and soak in the experience of watching her in her element.

Mom's Potato Leek Soup
Like any good mom recipe, this feeds a legion

3-4 lbs russet or Yukon Gold potatoes, peeled and cut into chunks
1-2 TBS kosher salt
water

3 medium-sized young leeks, white and light green parts only,
washed however you think is easiest and cut into small pieces
1/4 yellow onion, finely diced
1 rib celery (including leaves), finely diced
1/2 stick butter
1 can evaporated milk (not sweetened condensed milk!)
pinch of garlic powder
pinch of nutmeg
~1/2 tsp dried dill, crushed
salt and pepper to taste

Fill a large stock pot with enough water to cover peeled, chopped potatoes by about 3-4 inches. Add potatoes and 1-2 TBS salt, and boil until one of the biggest chunks can easily be pierced with the point of a knife or a fork.

Meanwhile, saute onion, celery, and leeks in butter with another pinch of salt until tender. 

Partially drain potatoes, leaving about 3 cups of the cooking liquid in the pot with them. Add can of evaporated milk, spices, and sauteed veggies. While combining, gently mash some of the potatoes to add thickness to soup, while leaving most chunks whole. Add salt and pepper to taste.


Serve with crumbled bacon, a sprinkling of cheese and scallions, or with a side of cheesy toast. 
Enjoy!

Saturday, January 19, 2013

Grilled Stuffed Peppers

Aaaah, if not for the 50- and 60-degree days in January, no on would live in Texas.

Feeling an urge to soak up some midwinter sun, yet still craving the comforts of an open fire? How about some tiny, sweet peppers in all the colors of sunshine, wrapped in bacon, and grilled to tasty perfection?

Sunshine? Check.

Fire? Check.

Tasty? Check, check, check!

Courtney's Grilled Stuffed Peppers
Assume 4-5 per person
This recipe stuffed about 30

1 cup fresh breadcrumbs (I used French bread)
1 cup shredded cheese (I used a colby/jack mix)
4 oz cream cheese, at room temp (1/2 package)
1 tsp garlic powder
1 tsp onion powder
2 large eggs

Dulcetta (small sweet) peppers, split from top to tail and any present seeds removed

Thick-cut bacon, one slice for every three peppers

Wash, split, and de-seed peppers (it is not necessary to remove the stem- in fact, leaving it on will enable
you to more completely close in the stuffing and prevent leaks while grilling).

In a medium-sized bowl, combine cream cheese, eggs, shredded cheese, garlic powder, and onion powder.

In a food processor, pulse 3-4 slices of fresh bread until a coarse
crumb is achieved (you are looking for about 1 cup crumbs). Add
crumbs to egg/cheese mixture.

Mixture should have a thick and relatively dry texture.

Carefully scoop filling into cleaned, split peppers, being careful not to break peppers apart.
My peppers held an average of 2 tsp of filling per pepper.

Once peppers are filled and squished closed, cut bacon
slices into thirds and wrap 1/3 piece of bacon around each pepper.
Slide on to skewer*, making sure skewer pierces overlapping
bacon ends to ensure a good wrap.

Place skewers of peppers over heated coals (avoiding open flames like in photo, unless super-charred is your style).
Peppers are ready when bacon is crisp, pepper skin is slightly charred, and filling is hot and gooey.
These peppers are a crowd pleaser, and a for-sure hit for any Super Bowl party that may be coming up, so put a pin in this and enjoy!

*If no grill there be, you can use toothpicks and your broiler!